Request a topic or
contact an Arke consultant
404-812-3123
April 2010

Arke Systems Blog

Useful technical and business information straight from Arke.

About the author

Author Name is someone.
E-mail me Send mail

Recent comments

Archive

Authors

Disclaimer

The opinions expressed herein are my own personal opinions and do not represent my employer's view in anyway.

© Copyright 2024

Syncing Arbitrary Contacts from CRM to Outlook

This is a trick I learned at Convergence this year that I really like.  For those of you that weren’t there, I figured I’d document this neat little enhancement to CRM and Outlook.

The end goal here is to allow CRM users to sync up arbitrary contacts to their Outlook, regardless of who may own the Contact.  This can be very useful when you have multiple people work one deal, or when personal and business contacts might overlap.

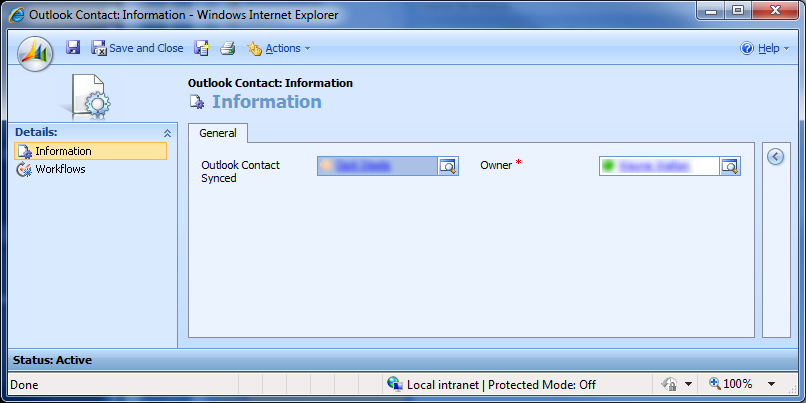
The first thing to do is create an Entity called Outlook Contact.  Make sure you make it User owned, and the only place it should reside is the Workplace.  Also, it does not need Notes or Activities.  It’s a very simple Entity, and the only thing you’re going to add to it is an N:1 lookup to Contact (make it Parental, there’s no reason to keep the Outlook Contact Entity if the Contact itself is deleted).  Then simplify the form to the point that the only things on it are the Owner and the Outlook Contact to Sync.  Make sure nothing else is Searchable, then publish.  (Don’t forget to set permissions on all roles for Outlook Contact!  By default, roles should be set as User across the board)


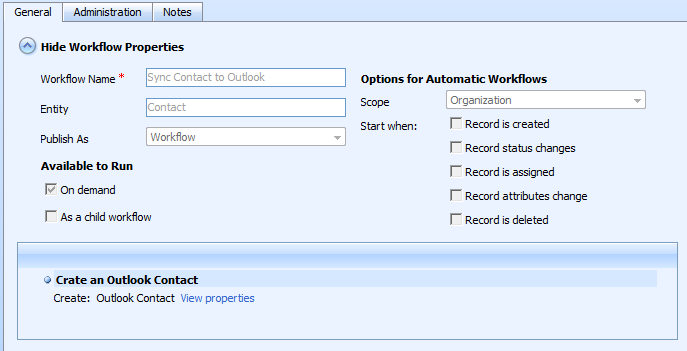
Next, we need to make the Workflow.  Make it against a Contact, and make it On Demand.  Like the image below:


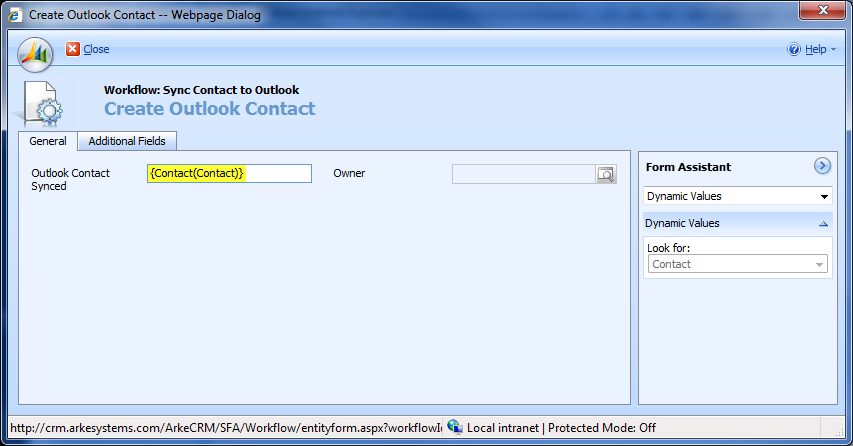
The actual creation of the Outlook Contact Entity is very simple, as pictured below:


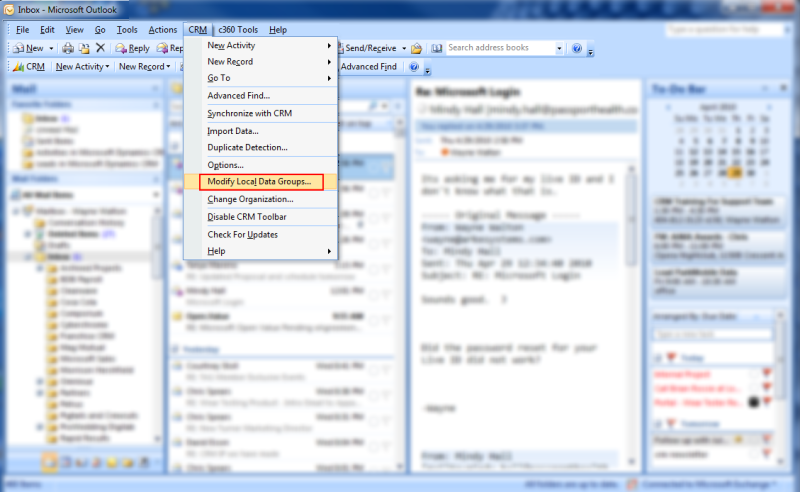
Once the Workflow is complete and you have Published it, go to your Outlook Client and find the “Modify Local Data Groups” button like in the image below (this part is a per-user setting, so every person that wants to be able to leverage this trick will have to follow these steps):


Once in there, you will see a Data Group called “My Contacts”.  I turned it off in my settings, but that’s a personal preference.  If you aren’t familiar, the My Contacts Data Group is the one that syncs all Contacts you own in CRM.


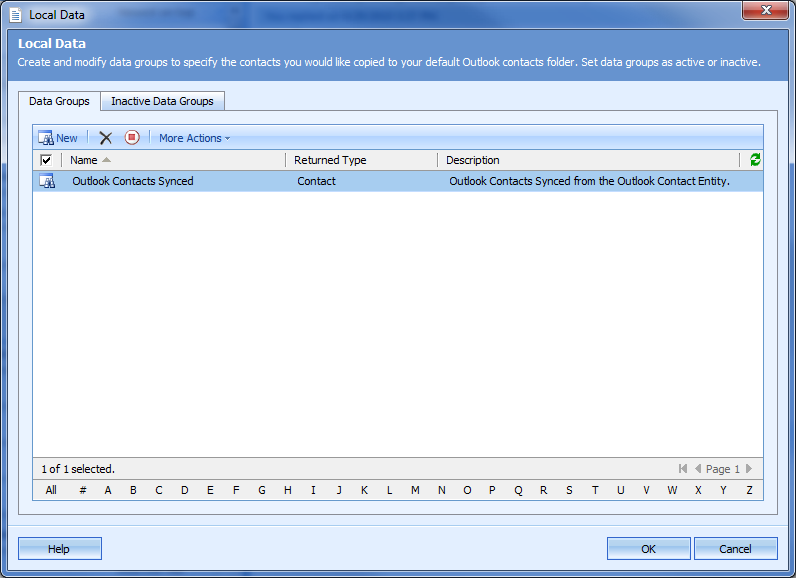
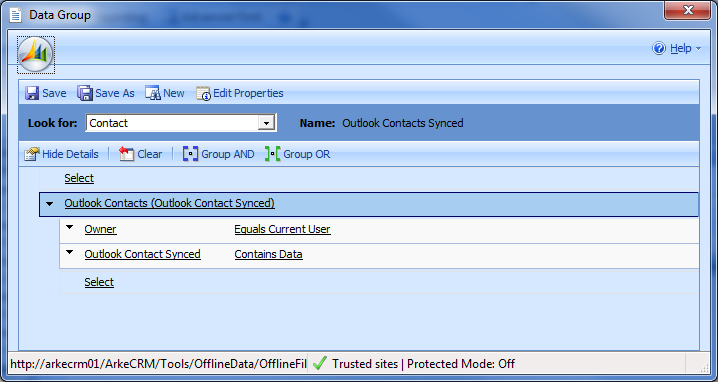
You then will want to make a new Data Group and call it “Outlook Contacts Synced”.  Set it up to look like the image below and Save it.


Once that is all set up, go to the CRM Contacts list and run the Workflow on any Contacts you want in your Outlook Contacts list.  This will work even on Contacts you don’t own, as long as you have Append To permissions on all Contacts.  To see immediate results, click “Synchronize to CRM” in the CRM menu in Outlook!  Otherwise, they will show up on the normal Outlook/CRM sync schedule.

That’s it; you now have any CRM Contact you want in Outlook (and by extension, your mobile device)!  To remove the Contact, just Delete the Outlook Contact Entity in CRM, and it will be removed on next Sync.


Posted by Wayne Walton on Thursday, April 29, 2010 5:26 PM
Permalink | Comments (0) | Post RSSRSS comment feed

Raw users in CRM

CRM decides which user account to use by finding the logged in user’s ObjectSID in the MSCRM database systemuserauthentication table.

You can get your ObjectSID out of Active Directory ( dsa.msc ) if you have a 32 bit server by registering a dll from the windows server 2003 resource toolkit ( http://download.microsoft.com/download/8/e/c/8ec3a7d8-05b4-440a-a71e-ca3ee25fe057/rktools.exe ) (I don't know how to make it work on 64 bit; docs say 64 bit is not supported) - install toolkit, copy acctinfo.dll to c:\windows\system32 (copy step may not be necessary), "regsvr32 acctinfo.dll".  Then browse to user in AD ( start/run/dsa.msc ) and look at the 'additional account info' tab (doesn't show up when user is found using find, unfortunately).

Now that you have an ObjectSID, that can be found in the authinfo column of systemuserauthentication , which gives you a userid.  You can use that userid to query systemuser and get a default organization id; You can use that organizationid and userid to query systemuserorganizations , which gives you a crmuserid.  Finally this crmuserid guid is the systemuser id for your actual organization’s CRM database.  Note that the two different systemuser tables are unrelated and use different guids; one is for the crm config db, and one is for your organization crm db.


Posted by David Eison on Thursday, April 22, 2010 4:11 PM
Permalink | Comments (0) | Post RSSRSS comment feed

CRM Custom Workflows and “This workflow includes an invalid reference”

When using a custom workflow dll in CRM, make sure to register it with the same GUIDs on production as you do on your dev CRM server.  You can do this easily by using export/import from the plugin registration tool.

When you make a workflow, anything that uses a step from the custom workflow will end up referring to it by GUID.  So if the guids don’t match for the dll, you can’t import/export workflows between the environments. And it’s not an easy fix by editing guids in the customization export file, because workflows are serialized inside this file.

If you find out about the problem early, you can unregister and reregister the dll with the right GUID.  If you find out about the problem late, after someone has already developed workflows separately in both environments, you may need to delete anything that uses data from the custom dll and recreate those workflow steps.

It shows up as an error message of “This workflow contains errors and cannot be published”, and “This workflow includes an invalid reference”.  (The invalid reference message is a generic there-is-a-guid-that-doesnt-match error, it could also be referring to a record like a system user.)


Posted by David Eison on Saturday, April 17, 2010 1:37 AM
Permalink | Comments (0) | Post RSSRSS comment feed

Debugging with Visual Studios (SQLite error)

I’ve run into a reoccurring error that only pushes to the surface while debugging.  The following error:

Could not load file or assembly 'System.Data.SQLite, Version=1.0.48.0, Culture=neutral, PublicKeyToken=db937bc2d44ff139' or one of its dependencies. An attempt was made to load a program with an incorrect format.

Is a result of IIS and the windows box trying to run 32 vs 64 bit versions of the application and of the sqlLite.dll.  There are two dlls involving sqlLite.  One is System.Data.SQLite, the other System.SQLite.  If you don’t require SQLite in your project, remove it or rename it from a .dll extension.  See post for Web Forms for Marketers on how SQLite might affect you.  If you must use SQLite, it is recommended that you download the correct version of the dll from here: http://www.sqlite.org/download.html 

**There have been issues with people running the application after downloading the correct 64 version of the dll and running sitecore as a 64 bit application.  Be sure you have .NET SP 1 installed on your VM or other.


Tags: , , , ,
Categories: Sitecore
Posted by Nicole Rodriguez on Monday, April 12, 2010 12:37 PM
Permalink | Comments (0) | Post RSSRSS comment feed

Web Form for Marketers

For those just downloading the installer, check inside your downloaded file first (and ALWAYS for future packages) and be sure that there is only one zip inside called 'package.zip'.  Do not unzip that file.  Sometimes they wrap the package in another zip for downloading off their website.  If you do not catch a double zipped package, you bring doom and reinstall for your application.  Follow the instructions on installing packages as suggested on www.sdn.sitecore.net .  After installing, it is not a finished out of the box product.  Follow the instructions below.

To submit forms (Associated Error: ‘We experience a technical difficulty while processing your request. Your data may not have been correctly saved.’) 

-          Open SQL Server and attach database located in Website/Data/Sitecore_WebForms.mdf

-          Open forms.config file in Website/App_Config/Include/forms.config

-          Uncomment the mssql connection string and add the proper fields

-          Open connecitonstrings.config in Website/App_Config/Connectionstrings.config

-          (The magic.) Add this to your config: <add name="remoteWfmService" connectionString="url=http://localhost/sitecore%20modules/shell/Web%20Forms%20for%20Marketers/Staging/WfmService.asmx;user=admin;password=b;timeout=60000"/>

-          Test.


Categories: Sitecore
Posted by Nicole Rodriguez on Monday, April 12, 2010 12:31 PM
Permalink | Comments (0) | Post RSSRSS comment feed